GitHub Terminal Connection
Now that you have your server secured and SSH keys set up, it's time to connect your server to GitHub so you can easily push and pull code from your repositories. This chapter will walk you through the process of setting up GitHub authentication from your server's terminal.
What You'll Learn
In this chapter, you'll learn how to:
- Generate SSH keys specifically for GitHub
- Add your SSH public key to your GitHub account
- Test your GitHub connection
- Clone repositories and push code from your server
- Configure Git with your identity
Prerequisites
Before starting this chapter, make sure you have:
- Completed the Essential Server Security chapter
- A GitHub account
- SSH access to your server
- Basic familiarity with terminal commands
Step 1: Generate SSH Keys for GitHub
First, let's generate a new SSH key pair specifically for GitHub. While you could use the same key you created for server access, it's a good practice to use separate keys for different services.
# Generate a new SSH key for GitHub
ssh-keygen -t ed25519 -C "Example Remote Server" -f ~/.ssh/github_key
When prompted:
- Enter a passphrase (recommended for security) or press Enter for no passphrase
- The key will be saved as
~/.ssh/github_key(private) and~/.ssh/github_key.pub(public)
Step 2: Test Your SSH Key
Let's test that your SSH key was created correctly:
# Display your public key to verify it was created
cat ~/.ssh/github_key.pub
You should see output starting with ssh-ed25519 followed by your comment you left with the -C.
Step 3: Configure SSH for GitHub
Since we're using a custom key name (github_key instead of the default), we need to tell SSH which key to use when connecting to GitHub. Create an SSH config file:
# Create or edit SSH config file
nano ~/.ssh/config
Add the following configuration:
Host github.com
    HostName github.com
    User git
    IdentityFile ~/.ssh/github_key
    IdentitiesOnly yes
Save the file (Ctrl+X, then Y, then Enter in nano).
This configuration tells SSH to:
- Use your custom
github_keywhen connecting to GitHub - Only use the specified key (not try other keys)
- Connect as the
gituser (required for GitHub)
Step 4: Copy Your Public Key
You need to copy your public key to add it to GitHub. Since we already displayed it in the previous step, you can copy it from your terminal output. If you need to see it again:
# Display your public key
cat ~/.ssh/github_key.pub
Copy the entire output (it should start with ssh-ed25519 and end with your comment).
Step 5: Add SSH Key to GitHub
Now you need to add your public key to your GitHub account:
-
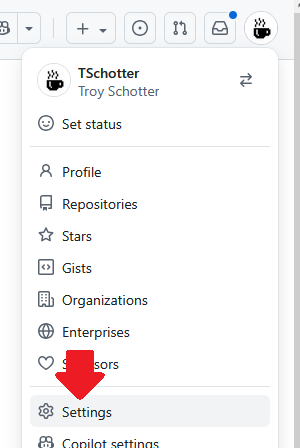
Go to GitHub Settings
- Click on your profile picture in the top-right corner
- Select "Settings" from the dropdown menu
-
Navigate to SSH Keys
- In the left sidebar, click on "SSH and GPG keys"
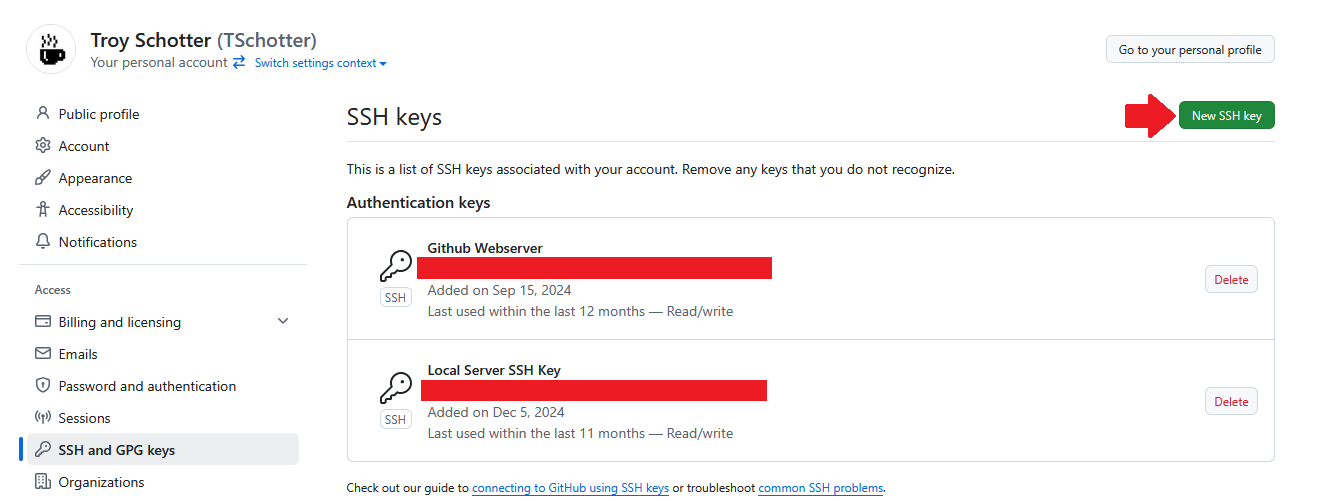
-
Add New SSH Key
- Click the "New SSH key" button
- Give your key a descriptive title (e.g., "My Server - Ubuntu 22.04")
- Paste your public key into the "Key" field
- Click "Add SSH key"

Step 6: Test Your GitHub Connection
Test that your SSH connection to GitHub is working:
# Test SSH connection to GitHub
ssh -T git@github.com
You should see a message like:
Hi username! You've successfully authenticated, but GitHub does not provide shell access.
If you see this message, congratulations! Your GitHub connection is working.
Step 7: Configure Git Identity
Set up your Git identity on the server:
# Set your name and email for Git commits
git config --global user.name "Your Name"
git config --global user.email "your-email@example.com"

# Verify your configuration
git config --global --list
Step 8: Clone a Repository
Now you can clone repositories from GitHub:
# Clone a repository using SSH
git clone git@github.com:username/repository-name.git

# Navigate into the cloned repository
cd repository-name
Step 9: Create and Push to a Repository
Let's create a simple test repository to verify everything works:
# Create a new directory for your test project
mkdir github-test
cd github-test

# Initialize a Git repository
git init

# Create a simple test file
echo "# GitHub Connection Test" > README.md

# Add the file to Git
git add README.md

# Commit the changes
git commit -m "Initial commit - testing GitHub connection"

# Add your GitHub repository as the remote origin
git remote add origin git@github.com:username/your-repo-name.git

# Push to GitHub
# Note: Use 'main' for newer repositories or 'master' for older ones
git push -u origin main
# OR if your repository uses master branch:
# git push -u origin master
Setting Up Remote Origin
If you need to set or change the remote origin later:
# Check current remote
git remote -v

# Add a new remote origin
git remote add origin git@github.com:username/your-repo-name.git

# Change existing remote origin URL
git remote set-url origin git@github.com:username/your-repo-name.git

# Remove remote origin
git remote remove origin
Pushing Commits
Once your remote is set up, you can push commits:
# Push commits to the remote repository
# Use 'main' for newer repositories or 'master' for older ones
git push origin main
# OR
git push origin master

# Push and set upstream tracking (sets remote branch as default)
git push -u origin main
# OR
git push -u origin master

# Push all branches
git push --all origin

# Push tags
git push --tags origin
Troubleshooting Common Issues
Permission Denied Error
If you get a "Permission denied (publickey)" error:
- Make sure you're using the correct SSH key file path
- Verify your public key is correctly added to your GitHub account
- Test the connection again:
ssh -T git@github.com - If you set a passphrase, make sure you're entering it correctly when prompted
Wrong SSH Key Being Used
If GitHub is using the wrong SSH key, make sure you've created the SSH config file as described in Step 3. The config file should specify which key to use for GitHub connections.
Git Push Requires Username/Password
If Git asks for username and password when pushing:
- Make sure you're using the SSH URL (
git@github.com:username/repo.git) not HTTPS - Check that your SSH key is properly added to GitHub
- Verify your SSH connection with
ssh -T git@github.com
Best Practices
Key Management
- Use different SSH keys for different services
- Occationally update your SSH keys. Don't use the same SSH key for years.
- Use passphrases for your private keys
- Never share your private keys
Repository Security
- Use SSH URLs instead of HTTPS for better security
- Regularly review and remove unused SSH keys from your GitHub account
Next Steps
Now that you have GitHub connected to your server, you can:
- Clone existing repositories
- Create new projects and push them to GitHub
- Collaborate with others on shared repositories
- Set up automated deployments from GitHub
Summary
In this chapter, you learned how to:
✅ Generate SSH keys specifically for GitHub
✅ Add your SSH public key to your GitHub account
✅ Test your GitHub connection
✅ Configure Git with your identity
✅ Clone and push to repositories
✅ Set up remote origin (master/main)
✅ Push commits to GitHub repositories
Your server is now ready to work with GitHub repositories! In the next chapter, we'll explore more advanced server configuration topics.
Quick Reference Commands:
# Generate SSH key for GitHub
ssh-keygen -t ed25519 -C "your-email@example.com" -f ~/.ssh/github_key

# Test GitHub connection
ssh -T git@github.com

# Configure Git identity
git config --global user.name "Your Name"
git config --global user.email "your-email@example.com"

# Clone repository
git clone git@github.com:username/repository-name.git

# Set remote origin
git remote add origin git@github.com:username/repository-name.git

# Check remote configuration
git remote -v

# Change remote origin URL
git remote set-url origin git@github.com:username/repository-name.git

# Push commits (use 'main' or 'master' depending on your repository)
git push origin main
git push origin master

# Push and set upstream tracking
git push -u origin main
git push -u origin master